2nd Grade: Busy Bee!

 Hello, my name is Kayden!

I am a student at Arizona State University. I really enjoy teaching, and I am here to help you see just how fun using a number line can be! I can’t wait to help you learn how to add and subtract whole numbers on a number line! 

This activity focuses on students’ ability to add and subtract whole numbers using a number line. 

● Horizontal number line: Students will learn that when adding numbers you move to the right, and when subtracting numbers you move to the left. 

● Vertical number line: Students will learn that when adding numbers you move up the number line, and when subtracting you move down the number line.

This will meet the Arizona Common core standard, 2.MD.B.6, by helping students understand whole-number sums and differences within 100 on a number line diagram. 

What you will need:

● Provided template 

● Piece of cardboard 

● Clear tape 

● Glue 

● Scissors 

● String/yarn ● Pencil

Directions:

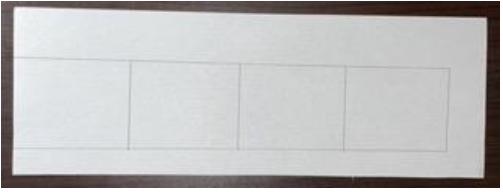
Let’s grab our template. Notice that you will be using one half of the paper for materials and the other half to solve addition and subtraction problems. There is an extra bee in case you need it, but we will only be using one bee for this activity. 

Since we are going to be working with number lines, I would like you to take a moment to read about how they work!

Step 1: First, we are going to get our scissors and cut out the number line and the bee. We are
going to use the bee as a marker for our numberline.

Step 2: Next, we are going to grab our piece of cardboard, and we are going to glue our number
line onto the cardboard.

Step 3: For the next step, please ask for help from an adult. We are going to use our pair of
scissors to make 2 holes, one on at the top of the number line and one at the bottom, like this:

Step 4: Then, we are going to grab our piece of yarn and weave it through both of the holes that
we made
. We will tie a knot in the back of the cardboard, like this:

Step 5: After our yarn is placed, we are going to tape our bee to the yarn so we can use it as a
marker for our numbers.
The red arrow on the bee will be used as the pointer.

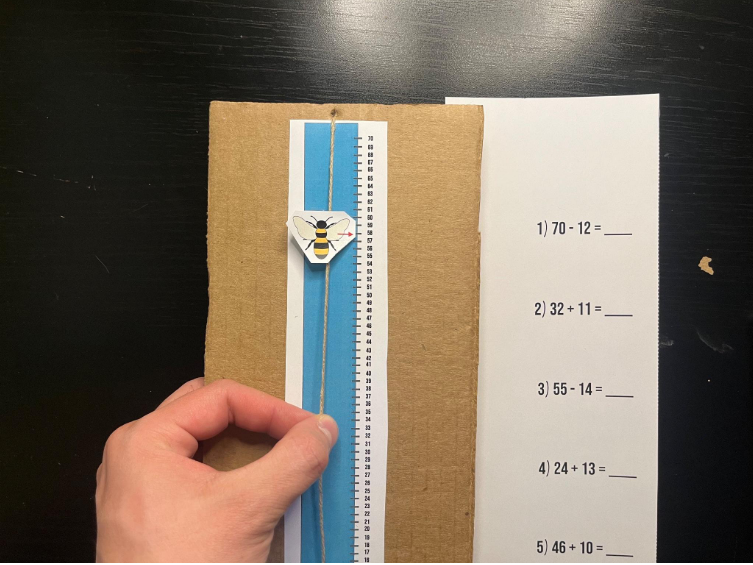
Step 6: So now that our number line is completed, we are going to solve the addition and
subtraction problems on our template.

Step 7: The first problem is 70 – 12. What we’re going to do is bring our bee all the way up to
our starting point at 70. Since we are subtracting 12, we are going to move our bee down 12
spaces.

You should end up at the number 58.


Step 8: The second problem is 32 + 11. So we are going to move our bee to our starting point at 32.

We are adding 11, so we are going to move our bee up 11 spaces.

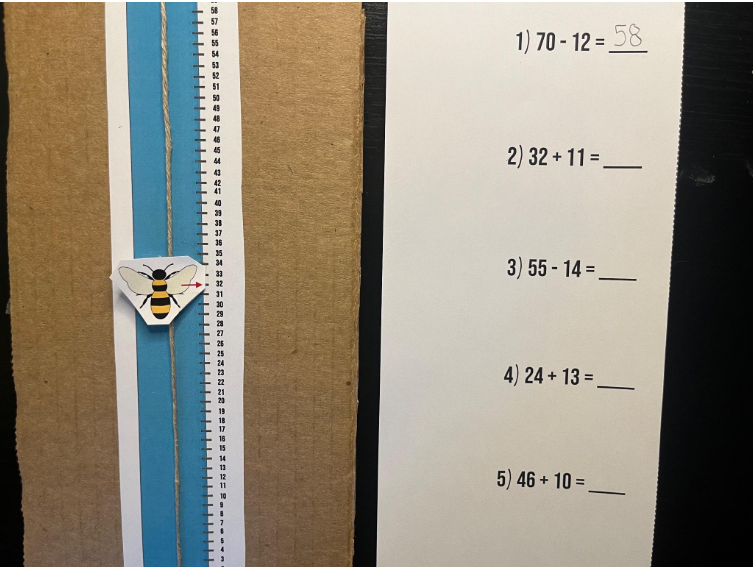
You should end up at the number 43.


Now that you have learned how to use a number line to add and subtract numbers, I would like
you to complete the last 3 questions on your own. I know you can do it!

Results: You did an awesome job learning about number lines, and how you can add or subtract using both vertical and horizontal number lines!

Thank you for visiting our blog! If you liked this activity and would like to see more, please visit our website and our Pinterest! See you next time!

1st Grade: Springtime Sun!

Hello, my name is Kayden!

I am a student at Arizona State University. I really enjoy teaching, and I am here to help you see just how fun learning about details can be! I can’t wait to help you learn how to express your ideas clearly using sentences!

This activity focuses on students’ ability to express their ideas and thoughts clearly in complete sentences. Additionally, students should be able to use details to describe people, places, things or events, and clarify ideas with the use of visuals.

This will meet the Arizona Common core standard, 1.SL.4, by helping students understand how to describe people, places, things, or events with relevant details, expressing ideas clearly

What you will need:

● Provided template 

● Piece of cardboard 

● Clear tape 

● Glue 

● Scissors 

● String/yarn ● Pencil

● Plate (2)
● Paint brush
● Acrylic paints (orange and yellow)
● Glue
● Scissors
● Pipe cleaner
● Wiggle eyes (2)
● Pencil
● Black marker

Directions:

For this activity, we are going to learn how to describe the sun, then we are going to create our own sun!

Now that we know we can use details to describe something or someone, we are going to write down some details about our sun.

Step 1: Let’s grab a plate and our pencil and write down some details about our sun using complete sentences. Let’s write down 3 details. Here are a few questions that can help us think of details that describe the sun.


Step 2: Let’s write the answers to each question on the plate using complete sentences. Here are a few details that we could write:
“The sun is yellow and orange.”
“The sun is big.”
“The sun is hot.”
These are all details that describe the sun. Now let’s create a face for our sun!


Step 3: First, we are going to paint our sun. Let’s pour out the colors orange and yellow. We are going to paint the circle inside the plate yellow, and the outside of the plate will be orange. When you have finished painting, let the plate dry for about 5 minutes.

Step 4: Next, we are going to create the face for our sun. Let’s grab two wiggle eyes and glue them on like this:


Step 5: Now we are going to create a smile. Grab your small piece of pipe cleaner, and bend it up until it looks like a smile. Glue it onto the sun’s face like this:


Step 6: Lastly, we are going to add on the nose and the eyebrows. Grab your marker, and draw a curved line in the center of the sun’s face. Then, draw 2 more curved lines above the eyes. Your finished product should look similar to this!


Great job! You have used details to write about the sun, and you have created your own sun!

Results:

Thank you for visiting our blog! If you liked this activity and would like to see more, please visit our website and our Pinterest! See you next time!

2nd Grade: Science Exploration

Hello, my name Yash!

I’m Masters student at ASU and I have always been interested in teaching children and making a positive impact in their lives. This passion for education and mentoring was further fueled by my sister, who has a master’s degree in early childhood development from UPenn and used to teach young children.
Through my interest and experience, I have realized the importance of providing children with hands-on, interactive learning experiences that make the learning process enjoyable and engaging. As such, I am excited to create activities like the “Measuring Madness” that can help young children develop essential skills in a fun and interactive way. Outside of my academic pursuits, I enjoy volunteering with local organizations that work with underprivileged children, as well as mentoring young students interested in pursuing careers in technology. I hope to continue making a positive impact in the lives of children and the education system as a whole through my future work as an educator and technology professional.

In the science explorer activity, you will learn a lot of new things! You will:

  • Learn how to research: You will find and use different resources to gather information
    about plants.
  • Improve your observation skills: You will observe and record the characteristics of plants
    and their changes over time.
  • Understand the life cycle of plants: You will learn about how plants grow, develop, and
    reproduce.
  • Practice writing: You will organize your research and observations into a written report
    or presentation.
  • Develop presentation skills: You will have the chance to share your report or presentation
    with others, practicing your public speaking and communication skills.
  • Think critically: You will analyze and evaluate the information you find and think about
    different perspectives and patterns in the plant’s life cycle.
  • Use your creativity: You will get to use your imagination and creativity to create
    illustrations, diagrams, or other visual aids to support your report or presentation

This will meet the Arizona Common Core standard 2.NBT.A.3, by teaching students to participate in shared research and writing projects (e.g., read a number of books on a single topic to produce a report; record science observations).

What you will need:

● Provided template 

● Piece of cardboard 

● Clear tape 

● Glue 

● Scissors 

● String/yarn ● Pencil

1. Books about plants 

2. Computer or tablet with internet access 

3. Notebook or paper to record observations 

4. Pencil or pen

Directions:

In this activity, we will be exploring the life cycle of plants. We will learn about how plants  grow, develop, and reproduce. We will use a variety of resources, including books, videos, and  websites, to gather information about plants. We will also keep a record of our observations and  findings. 

Here are the steps required for the activity: 

1: Choose Your Plant

Let’s start by choosing a plant that interests you. It could be a flower, a fruit tree, a vegetable  plant, or any other type of plant. Once you have chosen your plant, write down its name and  draw a picture of it. 

Step 2: Research Your Plant 

Now it’s time to do some research! Use the internet or books to find information about your  plant. Look for information on the following topics: 

• The life cycle of the plant 

• How the plant grows and develops 

• The plant’s physical characteristics 

• The plant’s habitat and environmental needs 

As you read and gather information, take notes in your notebook or on a piece of paper. Write  down any interesting facts, new words, or questions you have. 

Step 3: Make Observations 

In addition to researching your plant, it’s also important to observe it in real life. Find a plant of  the same type as the one you are researching and observe it closely. Look at the plant’s leaves,  stems, flowers, and roots. Draw a picture of the plant and label its parts.

Take note of any changes you see in the plant over time. Does it grow taller? Does it produce  new leaves or flowers? Record your observations in your notebook. 

Step 4: Create a Report 

After you have gathered all of your information and observations, it’s time to create a report  about your plant. Use your notes and observations to write a short report or presentation about  your plant. Make sure to include the following information: 

• The name of your plant 

• The life cycle of your plant 

• The physical characteristics of your plant 

• The habitat and environmental needs of your plant 

• Any interesting facts you learned 

If you are making a presentation, you can include pictures or drawings to illustrate your points.

Step 5: Share Your Report 

Now that you have created your report, it’s time to share it with others! You can share it with  your family, friends, or classmates. You can also post it online or present it in front of your class.

Step 6: Reflect on Your Learning 

Finally, take some time to reflect on what you have learned. Think about what you found most  interesting, what surprised you, and what you would like to learn more about. You can write  your reflections in your notebook or share them with someone else. 

Results:

Great job, young researchers! After completing the “Science Explorer” activity, you will have  learned many important things, including: 

• How to use different resources like books and websites to research and gather  information. 

• How to observe and record the characteristics of plants. 

• The different stages of a plant’s life cycle, including germination, growth, reproduction,  and death. 

• How to organize your research and observations into a written report or presentation. 

• How to share your report or presentation with others, developing your public speaking  and communication skills. 

• How to analyze and evaluate information, considering different perspectives and  identifying patterns and relationships between different aspects of the plant’s life cycle. 

• The opportunity to use your creativity to create illustrations, diagrams, or other visual  aids to support your report or presentation.

Keep up the great work exploring and learning about the world around you! 

Thank you for visiting our blog! If you liked this activity and would like to see more, please visit our website and our Pinterest! See you next time!

1st Grade: Create by Number: Easter Edition!

Hello, my name is Kayden!

I am a student at Arizona State University. I really enjoy teaching, and I am here to help you see just how fun learning about numbers can be! I can’t wait to help you understand more about the tens and ones place values! 

This activity focuses on the place values of one and two-digit numbers. During this activity, students will use the materials to create an Easter bunny, taking note of the given numbers and their respective place values. 

This will meet the Arizona Common core standard, 1.NBT.2A, by helping students understand that the two digits of a two-digit number represent amounts of tens and ones.

What you will need:

● Provided template 

● Piece of cardboard 

● Clear tape 

● Glue 

● Scissors 

● String/yarn ● Pencil

Template 

● Colored pencils/crayons 

● Short pieces of yarn (6) 

● Cotton ball 

● Wiggle eyes 

● Glue

Directions:

Today we are going to create an Easter Bunny by using numbers and remembering their place values! 

Remember that all numbers have place values. For this activity, we will focus on numbers with ones and tens place values. You can look back at this example if you need help figuring out the place values for each number in this activity.

1. Before beginning each step, let’s look at the numbers on the template and figure out their place values. For example, the first number is 2. The number 2 is in the ones place, it does not have any values in the tens place. 

2. Let’s look at what the number 2 says. Number 2 says to color in the bunny ears red or pink. 

3. The next number is 7. After you find out the place values for the number 7, let’s color the bunny’s head gray.

4. The next number is 18. After finding the place values of the number 18, let’s glue on the wiggle eyes, like this:

5. Next, is the number 36. After you find out the place values for the number 36, we are going to glue the cotton ball on the bunny’s nose.

6. The last number is 59. After you have figured out the place values for the number 59, we are going to glue on some whiskers. Make sure you glue 3 short pieces of yarn to each side of the face. This is the final step for the activity.

Results: 

Results: You were able to use numbers to create an Easter Bunny! You did an awesome job learning about one and two-digit numbers and the tens and ones place values. 

Thank you for visiting our blog! If you liked this activity and would like to see more, please visit our website and our Pinterest! See you next time!

Kindergarten: Let’s Build a Shape Workshop!

Hello, my name is Kayden!

I am a student at Arizona State University. I really enjoy teaching, and I am here to help you see just how fun learning about shapes can be! I can’t wait to help you understand more about 2D and 3D shapes and learn how to make them!

The goal of this activity is to focus on 2D and 3D shapes, specifically their characteristics, similarities and differences. During this activity, students will use the materials to create several shapes, taking note of their unique characteristics throughout the activity.

This will meet the Arizona Common core standard, K.G.B.4, by teaching students how to construct 2D and 3D shapes which will allow them to further identify their unique characteristics (sides/corners,).

What you will need:

● Provided template 

● Piece of cardboard 

● Clear tape 

● Glue 

● Scissors 

● String/yarn ● Pencil

● Template
● Mini marshmallows
● Toothpicks

Directions:

Today, we are going to learn how to create 2D and 3D shapes with toothpicks and marshmallows! To determine whether a shape is 2d or 3d, we will have to look at the number of sides and corners. Let’s get started!

1. The first shape we are going to create is a square. A square is a 2D flat shape that has 4 corners, and 4 sides. For this activity, the marshmallows will be our corners, and the toothpicks will be our sides. We will need 4 marshmallows for the corners, and 4 toothpicks for the sides.

2. Let’s connect them together like this!

You should end up with a square that looks similar to this!

3. The next shape we are going to create is a 3D square (a cube). We already have 1 square created, so let’s create 1 more square to help form our cube.

4. After we have 2 squares, let’s grab 4 more toothpicks to connect them together. You should end up with a cube!

You’ve done an awesome job at creating your square and cube. Let’s make 1 more 2D shape and 1 more 3D shape to add to our collection!

5. Now, we are going to create a pyramid. In order to do that, we need to create a 2D square first. The square will be the bottom of the pyramid. Let’s grab 4 marshmallows and 4 toothpicks and connect them like this.

6. Now that we have our square, we are going to need 4 more toothpicks and 1 more marshmallow to form our pyramid. Let’s connect them together like this, with each toothpick connecting to the one marshmallow at the top:

7. When finished, you should end up with a pyramid that looks similar to this!

Results: You were able to use 2D shapes to create 3D shapes! You did an awesome job learning about 2D and 3D shapes and how to create them.

By the end of this activity, students will have learned how to identify 2D and 3D shapes based on their characteristics (number of sides and corners). They can then apply what they learned and begin to identify real-life 2D shapes and 3D objects that we see all around us.

Thank you for visiting our blog! If you liked this activity and would like to see more, please visit our website and our Pinterest! See you next time!

1st Grade: Wildcard Operations!

Hello everyone!

My name is Javier, a junior at ASU majoring in Computer Science. As an engineering student, I know the importance of basic knowledge regarding mathematical operations, including the topics focused on here today. I hope this activity encourages students to further practice their understanding of mathematical concepts and explore the opportunities engineering can offer!

Students will be able to perform quick operations using a fun and competitive race game against friends! The goal is to help students understand different methods of operations and be able to perform addition to subtraction, or vice versa.

This will meet the Arizona Common Core standard ( 1.OA.B.4), by teaching students to Understand subtraction as an unknown-addend problem. For example, subtract 10 – 8 by finding the number that makes 10 when added to 8.

What you will need:

● Provided template 

● Piece of cardboard 

● Clear tape 

● Glue 

● Scissors 

● String/yarn ● Pencil

  • Two sheets of paper
  • Sharpie (or pencil, pen, etc.)
  • Scissors
  • OPTIONAL: a cup to randomize operations

Directions:

  1. With a single sheet of paper, fold or draw outlines as demonstrated.
  1. For each two boxes, write the same number, from 0 to 9, including two addition signs and two subtraction signs. For further fun, include two WILD boxes. Additionally, one can fill the remaining 16 boxes with repeated sequences of numbers, signs, or their own spin!
  1. Cut each square using scissors or by hand.
  1. Randomly three select cards, any of the possible variations are valid:
    1. two number cards, one operation sign
    2. one number card, one operation sign, one WILD card
    3. if an EQUAL card is selected, the total number of cards should be four
  1. On the second sheet of paper, write the operation that was selected (NOTE: the higher value number should appear first)
  1. Have the second player finish the operation and find TWO new alternatives using the same numbers in the current operation.
  1. In case of a current operation where an EQUAL sign is in play, place the smallest value number after the operation but before the EQUAL operation; the high value should be what the expression equals to. Continue the operation like the previous step.

8. In case of a WILD card in play, have the alternative player list ALL the addition, or subtraction, of the number card ranging from 0 to 9, as explained.

Results: Your students should now be more familiar with performing mathematical operations on basic numbers ranging from 0 – 9 and understand how one can flip from addition to subtraction.

Thank you for visiting our blog! If you liked this activity and would like to see more, please visit our website and our Pinterest! See you next time!

1st Grade: Our Frog Friend, Freddy!

Hello, my name is Kayden!

I am a student at Arizona State University. I really enjoy teaching, and I am here to help you see just how fun answering questions can be! I can’t wait to help you understand more about gathering information and how to use that information to answer specific questions. 

This activity focuses on answering questions. During this activity, students will learn how to gather information from a story and use that information to answer questions and create their own frog.

This will meet the Arizona Common core standard 1.W.8 by teaching students how to recall and gather information to answer questions.

What you will need:

● Provided template 

● Piece of cardboard 

● Clear tape 

● Glue 

● Scissors 

● String/yarn ● Pencil

  • Printable template
  • Piece of construction paper (yellow or green)
  • Colored pencils/crayons
  • Black and red marker
  • Scissors
  • Glue stick
  • Googly eyes

Directions:

1. First, let’s read a little bit about frogs. 

2. Now, here are some questions about frogs that I’d like you to answer. Keep these questions in mind, we will be writing the answers down in just a moment.

  • What helps a frog swim?
  • What helps a frog jump?
  • How can frogs live underwater and above water?

3. First, we are going to grab our template and color in the parts of the frog. I am going to use green, but you can use any color. The template has two frogs, but we will only be using one. Tip: we will be using wiggle eyes instead of the eyes on the template. 

4. Next, we are going to cut each piece out from the template. Please make sure to have an adult help you cut these out. 

5. Then, we are going to gather our pieces and write the answers to the questions on the back side of the pieces.

  • What helps a frog swim? Webbed hands and feet, so we are going to write “webbed hands” on the hands. The hand cutouts are slightly smaller than the feet, so make sure you write on the correct ones.
  • What helps a frog jump? Strong legs, so we are going to write “strong legs” on the legs. 
  • How can frogs live underwater and above water? Gills and lungs, so we are going to write “gills and lungs” on the head of the frog. Remember the writing needs to be on the back side of our pieces. 

6. Now that we have all of our pieces gathered, we are going to grab our piece of construction paper. We are going to cut two long strips out. Make sure they are about the same size. These will be used to make the paper spring. 

7. Let’s apply some glue on one end of both strips. Place one strip horizontally and the other one vertically. We will be overlapping the parts that we glued. 

8. Now we can start folding the two strips like this:

9. After folding the strips, we will glue the ends together like this:

10. Now let’s set our strips aside and move on to the frog. Grab 2 wiggle eyes, and glue them on the frog.

11. Then, we are going to grab our black and red markers and draw a smile, cheeks, and some freckles.

12. Now we are going to glue the feet to the bottom of the spring, and the arms will be glued on top of the paper spring. 

13. Lastly, we are going to glue the head on top of the green square.

14. You should end up with something similar to this: a colorful frog that likes to jump!

By the end of this activity, students will have learned how to gather information from provided sources. They can then use the gathered information to answer questions and write their answers on the respective parts of the frog.

Results:

Thank you for visiting our blog! If you liked this activity and would like to see more, please visit our website and our Pinterest! See you next time!

Kindergarten: Life of a Butterfly

Hello everyone, my name is Noelia Lachica!

I am a fourth-year student at ASU majoring in psychology and minoring in family and human development. I am  teaching this standard and activity because I am a tutor with America Reads at ASU and I want to help students learn new material they have not learned before. 

The learning goal of this activity is for the student to learn about the cycle of a caterpillar and how it becomes a butterfly. By doing so, they will also be learning a series of events and the order in which they occur. The student will be tested at the end of the activity by needing to rearrange, in order, the cutout definitions and drawings after mixing them up. 

This will meet the Arizona Common Core standard (K.W.3), by teaching students to use a combination of drawing, dictating, and writing to narrate a single event or several loosely linked events, tell about the events in the order in which they occurred, and provide a reaction to what happened.

What you will need:

● Provided template 

● Piece of cardboard 

● Clear tape 

● Glue 

● Scissors 

● String/yarn ● Pencil

  • 1 piece of paper
  • Scissors 
  • Pencil 
  • Colored pencils or markers 
  • Ruler 

Directions:

1. Grab your piece of paper and flip it horizontally. 

2. Using your pencil and ruler, draw four boxes.

3. In the first box, write “egg”. 

4. In the second box write “Caterpillar”

5. In the third box write “Pupa”

6. In the fourth box write “Butterfly” 

7. Using the help of an adult, grab the scissors and carefully cut out each box.

8. Using what is left of the paper, create the same four boxes once again. 

9. Now, in the first box draw an egg. Feel free to color it however you like. 

10. In the second box, draw a caterpillar and color it however you’d like. 

11. In the third box, draw a pupa, as I did below. Color as you wish. 

12. In the fourth box, draw a butterfly. Color it how you’d like.

13. Again, using the help of an adult, grab your scissors and cut each box out. 

14: Now, mix up all your cards and rearrange them in the correct order with the appropriate drawing. 

Yay! You’ve finished this activity! The student should have created a series of steps that take place for a butterfly to form. The student should have learned about the order of events that take place for a butterfly to come about through drawings. 

Thank you for visiting our blog! If you liked this activity and would like to see more, please visit our website and our Pinterest! See you next time!

Kindergarten: Uppercase and Lowercase Matching!

Hello everyone! My name is Elliot!

I am currently a senior at ASU majoring in Educational Studies. I really enjoy interning with America Reads because it gives me an opportunity and practice to create unique and engaging activities for students of all ages. When creating these hands-on activities, I want it to encourage students to take an interest in their own learning and become more creative. In this activity, the students will be matching upper and lowercase letters with their correct pairing. The students will match the letters up on a table surface by pairing the letters together. This practice game can be done as a class or individually.

In this activity, students will be able to identify the difference between upper and lowercase letters of the
alphabet

This will meet the Arizona Common Core standard (K.RF.1f), by teaching students to recognize and name all upper and lowercase letters of the alphabet.

What you will need:

● Provided template 

● Piece of cardboard 

● Clear tape 

● Glue 

● Scissors 

● String/yarn ● Pencil

● Marker/Pen/Black Crayon
● Post-its (2 different colors)
● Bowl

Directions:

1. First, grab all the needed materials for your student. Find a flat open surface where the matching can happen.

2. Next, pre-fill out the upper and lowercase letters on the post-its for your students.

3. Then, take the uppercase letters and place them on the table in a line so the lowercase letters can be placed underneath for matching. Put the remaining red cards with lowercase letters in the bowl for the start of the watching game.

4. Next, you’re going to pull the lowercase letters at random from the bowl and align them with the correct uppercase letters. For example, it will begin to look like this:

5. Then, let your student(s) finish the remainder of the alphabet on the table. The completed matching game should look like this with an empty bowl:

Your students should now be able to identify which uppercase letters match with the lowercase letters through this visual hands-on matching game.

Thank you for visiting our blog! If you liked this activity and would like to see more, please visit our website and our Pinterest! See you next time!

Kindergarten: Summer Writing

Hello everyone! My name is MacKenzie!

I am currently a junior at ASU studying Secondary Education (English). I love working with America Reads because it gives me an opportunity to create unique and engaging activities for students of all ages. I love creating hands-on activities that encourage students to take an interest in their own learning.

In this activity, students will be able to draw images based on the descriptions of what they read. They will be able to utilize images and drawings to add detail to the descriptions. 

This will meet the Arizona Common Core standard (K.SL.5), by teaching students to add drawings or other visual displays to descriptions as desired to provide additional detail.

What you will need:

● Provided template 

● Piece of cardboard 

● Clear tape 

● Glue 

● Scissors 

● String/yarn ● Pencil

Directions:

1. Print out the summer vacation booklet template for your students. Tip: If needed, you can also make your own template or have students create one using construction paper. 

2. First, have the students write their names on their booklets and color their title page.

3.Then, have the students cut out each of the pages from the booklet template. Hint: Remember to remind students of scissor safety, and if needed, precut the template for the students. 

4. Next, have the students finish the sentence, “My favorite summer treat is” and draw a picture of what they write. 

5. Then, read the sentence “I ride my bike in the summer” with your students and have them draw a picture of the scenario. Tip: Encourage them to add fun details like flowers, animals, places, and more. 

6. Have the students finish the sentence, “My favorite summer activity is” and then draw a picture to match what they write. 

7. Next, read the sentence “I swim in the pool during the summer” with your students and have them draw a picture that fits the description. 

8. Instruct the students to finish the sentence, “This summer, I went to” and draw a picture to go with what they write. 

9. Read the sentence “I eat ice cream in the summer.” to your students and then have them draw a picture to go with what they’ve read.

10. Next, help the students finish the sentence “In the summer, I play” and then instruct them to draw a picture of what they stated. 

11. Lastly, have the students staple the pages of their booklet together. 

Results: Your students should now be able to add images to written descriptions. They should also be able to draw images that add more details to the description. 

Thank you for visiting our blog! If you liked this activity and would like to see more, please visit our website and our Pinterest! See you next time!